 I just started using Oracle’s VirtualBox for the first time this past weekend. Shortly after creating my first Virtual Machine with a Windows 7 guest, I created a clone just to test out this functionality. I was surprised to find out that within the clone, Windows 7 had to be re-activated. After doing some digging, I found a pretty simple way to create VMs so that the clones do not require a second activation. See the instructions after the break.
Warning: Following these steps may violate your license agreement with Microsoft. In many cases, you are only permitted to install a single copy of Windows on at most one machine. I believe this includes virtual machines. Please consult your sales representative to ensure you that are in compliance with your license agreement.
How to create a VirtualBox VM so that a clone does not require re-activation of Windows.
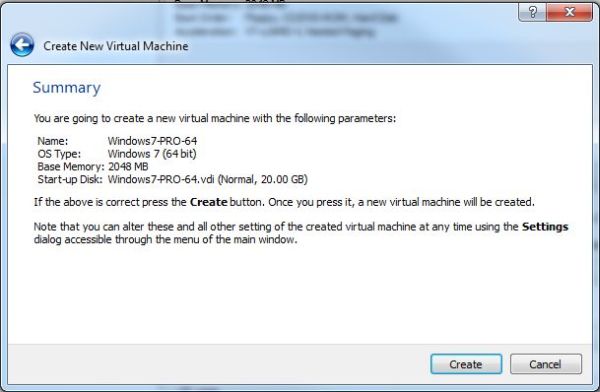
1. Create a new Virtual Machine for Windows 7. Do no install the operating system just yet!
2. Locate the vbox file of the VM you just created.

3. Open the file in a text editor and locate the “Machine uuid”. In the example below, see that the machine uuid is “02f110e7-369a-4bbc-bbe6-6f0b6864ccb6“.
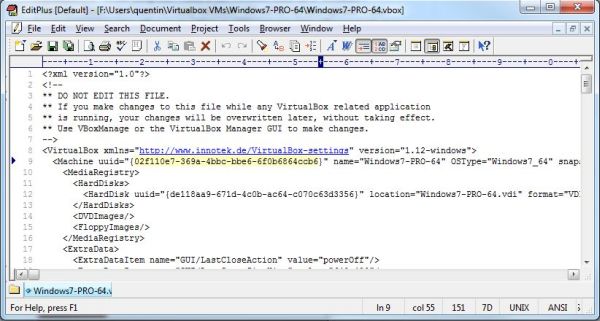
Typically when you clone a VM, a new machine uuid is generated. It is this change in the machine uuid that will cause Windows to change from an activated state to a non-activated state. In the next few steps, you will generate a new uuid that will not change when a VM is cloned. Thus, Windows will remain activated in each of the clones.
4. Use one of the following sites to generate a new uuid:
- http://www.guidgen.com/
- http://createguid.com/
- http://www.guidgenerator.com/online-guid-generator.aspx
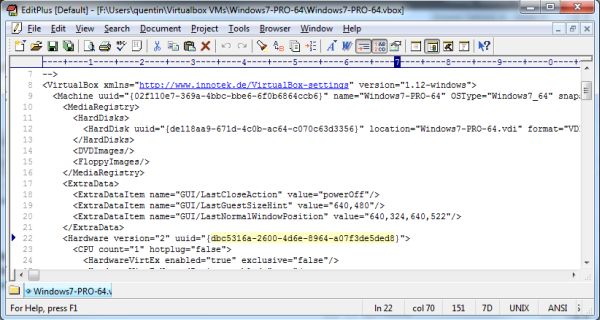
For this tutorial, I generated the uuid of “dbc5316a-2600-4d6e-8964-a07f3de5ded8“.
5. Open a command prompt and execute the following statement:
C:Program FilesOracleVirtualBoxvboxmanage modifyvm <machine uuid from the vob file> –hardwareuuid <the new uuid you generated>
In my example, the statement looks like this:
C:Program FilesOracleVirtualBoxvboxmanage modifyvm 02f110e7-369a-4bbc-bbe6-6f0b6864ccb6 –hardwareuuid dbc5316a-2600-4d6e-8964-a07f3de5ded8
6. Open the vbox file and verify that a new hardware “version 2” uuid was created:
You can now install Windows on your VM as normal. Once you activate Windows in your VM, you will be able to clone the VM and Windows will still be activated in the clone. Thus, you won’t have to perform a second windows activation.



Thanks for the guide. I have a technet account and I thought I was going to have to use all of my keys for each clone.
Thanks for the guide.
Ther is one interesting variation I just tried out: if one did not set the hardware UUID in the first place, it’s also possible to take the machine UUID of the source VM and set this as hardware UUID of the clone directly after cloning and just before starting the clone the very first time.
I think this could cause issues on the host machine in controlling multiple copies of guests with the same UUID. If you are trying to modify/affect a running Vbox guest using CLI the unique UUID is what lets the VboxManage command know what machine is being talked to.
Have you noticed any problems running multiple guests on the same host with the same UUID?
I haven’t tried to run multiple guests with the same uuid. I generally make a clean, well formed vm, I clone it, then begin using the clone. This way if I clobber the clone, I can simply clone the original again.
thnx
This is also possible after you’ve installed windows. Use the same command “vboxmanage modifyvm –hardwareuuid ” where you replace the with the current uuid in the .vbox file of the machine you want to clone. Then shut down the management console and all other virtual box related applications and modify the .vbox file manually by adding the row uuid=”{}” after <Hardware version="2"
Seems like some script messed the post a bit. The uuid=”{…}” bit goes inside the Hardware tag.
So what is the command again? I am confused.
1.
vboxmanage modifyvm –hardwareuuid
2.Add
uuid=”{}”
Thanks for the tip, Vin!
Thank you Vin. But how do we find the origuuid? I’m running into the same problem of windows reactivation. I tried running the following command in native windows command line to get the uuid: wmic PATH Win32_ComputerSystemProduct get uuid
But this doesn’t seem to work. Appreciate any help
I really like this: Windows keeps track of the UUID that I’ll use on my VM.
While it’s true that you still need to activate Windows 1 time in the VM (which probably invalidates any previous activtion of this particular partition – mine’s a clone of an activated (still valid) OEM install attached using “raw access” tricks on Linux), if you ever need to re-create the VM that points to the raw access partition modifyvm –hardwareuuid is the way to go to prevent reactivation issues. Thanks everyone.
Out of curiosity do the above work only for Win 7 ???? what about Win2k8R2S64B?
My guess is that it should work for that OS as well but you will have to test.
Note that if you have already installed the O/S and activated the license, you can still use the trick to make it fully clonable. All you have to do is to follow the same procedure but in the end, exchange the UUIDs between the virtual machine UUID and the hardware UUID in the VDI file. Actually, since the original machine UUID was used to activate the Windows licence, moving it into the hardware identifyer keeps Bill Gates genuine advantage satisfied. There are two files to modify. The first one is the VDI file in the folder where the virtual machine is and the second one is the XML file in the ,VirtualBox folder which contains the list of virtual machines and their UUIDs.
Of course, Bill Gates would prefer that you pay for each and every Windows system you have; virtual or not and single user or not. No ifs, no buts, this is not an acceptable procedure for Microsoft and they feel they have the right to unleash their lawyers after you for this.
Great tip! Thanks for sharing!
Thanks! This worked well.
I only swapped the guids in the vdi file. Instead of adjusting the xml file, I simply removed the vm from virtual box (without deleting data) and then reopened the vdi file and voila!
If the goal is to copy and existing vm to a new location and use it in an activated
state, I found this workable:
1. Create new vm in Virtual Box Manager. My example is named Test. Select OS
version and memory.
2. At the Hard Drive dialog, choose Do Not Add Hard Drive.
3. Navigate to the vm folder in (roughly) C:UsersUserNameVirtualBox VMsTest
3. Open the new Test.vbox file in this folder and find Machine uuid=”{a763eb94-d4a2-400b-99e7-7b50f11064d9}”. a763eb94-d4a2-400b-99e7-7b50f11064d9 is what we will
call the new machine uuid.
4. Let’s assume the vm you are copying from is also called Test and is working in
another environment. Go to that vm file location and open the Test.vbox file. Look
up this: <HardDisk uuid="{6e0b4d2d-93af-43cf-78c2-c8bd741e8d17}". We will call
6e0b4d2d-93af-43cf-78c2-c8bd741e8d17 the existing harddisk uuid.
4. Copy your existing vm into the folder of the newly created machine. Again, assume
the prior machine was also called Test and this file is Test.vdi (can be a few dozen
gb large for windows).
5. Open a command prompt and navigate to c:program filesoraclevirtualbox.
6. First run this to make sure the new disk will be referenced properly.
vboxmanage.exe internalcommands sethduuid "C:UsersUserNameVirtualBox VMsTest
Test.vdi"
This will return (if successful):
UUID changed to: 33e3b363-b1b9-455g-881d-d8235f7b958a (yours will differ)
7. Lastly, run this to make sure activation is not a problem later.
vboxmanage.exe modifyvm a763eb94-d4a2-400b-99e7-7b50f11064d9 –hardwareuuid
6e0b4d2d-93af-43cf-78c2-c8bd741e8d17
Once I ran this I was able to attach the Test.vdi disk to the vm without error and
activation prompt.
Trying again from step 4:
4. Let’s assume the vm you are copying from is also called Test and is working in
another environment. Go to that vm file location and open the Test.vbox file. Look
up this: HardDisk uuid=”{6e0b4d2d-93af-43cf-78c2-c8bd741e8d17}”. We will call
6e0b4d2d-93af-43cf-78c2-c8bd741e8d17 the existing harddisk uuid.
5. Copy your existing vm into the folder of the newly created machine. Again, assume
the prior machine was also called Test and this file is Test.vdi (can be a few dozen
gb large for windows).
6. Open a command prompt and navigate to c:program filesoraclevirtualbox.
7. First run this to make sure the new disk will be referenced properly.
vboxmanage.exe internalcommands sethduuid “C:UsersUserNameVirtualBox VMsTest
Test.vdi”
This will return (if successful):
UUID changed to: 33e3b363-b1b9-455g-881d-d8235f7b958a (yours will differ)
8. Lastly, run this to make sure activation is not a problem later.
vboxmanage.exe modifyvm a763eb94-d4a2-400b-99e7-7b50f11064d9 –hardwareuuid
6e0b4d2d-93af-43cf-78c2-c8bd741e8d17
Once I ran this I was able to attach the Test.vdi disk to the vm without error and
activation prompt.
This doesn’t work. Did you actually go to the System page and check the activation status?
I tried this and it changed the UUID but still gives me the alert that the hardware has changed!
On my vm the Office Suite was installed and became unactivated. This must look at a different part of windows. I have other versions I might install but I wonder if there is something else that MS Office inspects?
I’ve tried all the above steps with Windows 8 and it does not work. Activation still triggers on the cloned Windows 8 system, although “hardwareuuid” on both systems are the same. Any ideas?
I’ve followed the entire thread and did some unsuccessful experiments (windows 7 and apps appear unactivated in cloned vm).
I am dubious about some of the claims that are being made. Perhaps someone could elaborate and straighten me out.
To begin with the MS algorithm that checks whether activation is required looks at the hard drive UUID amongst other things, correct? That UUID is embedded in the VDI and also tracked by the OS/apps via the registry (I’m guessing).
So when Win 7 boots in a different (but copied) vm instance it had better see the original UUID that it squirreled away in order for the activation check to pass successfully.
Here’s the intractable problem as I see it. VirtualBox running on the same host OS will prohibit a vm from booting if the UUID of its VDI is not unique. But if the hard drive UUID of the copied VDI were forced to be unique then the activation check would fail.
What am I missing?
Tried several versions now and found one, that did the trick nicely:
When cloning a vbox do NOT create new MAC Adresses for the virtual network-adapters.
After creating a clone of a registred Win7 vbox BUT NOT starting it!!!
do the following:
# vboxmanage showvminfo “”
find the lines containing the string ‘UUID’
you could simply grep for it like this:
# vboxmanage showvminfo “” | grep UUID
gives you two lines:
UUID: df1XXXXX-XXXX-XXXX-XXXX-XXXXXXXXXXe6
Hardware UUID: df1XXXXX-XXXX-XXXX-XXXX-XXXXXXXXXXe6
notice, that both are identical!
now set the “Hardware UUID” of the newly created clone:
# vboxmanage modifyvm “” –hardwareuuid “”
and add the Hardware UUID to the BIOS Image of your clone:
# vboxmanage setextradata “” “VBoxInternal/Devices/pcbios/0/Config/DmiSystemUuid” “string:”
now check:
# vboxmanage showvminfo “” | grep UUID
UUID: 8a4YYYYY-YYYY-YYYY-YYYY-YYYYYYYYYYb9
Hardware UUID: df1XXXXX-XXXX-XXXX-XXXX-XXXXXXXXXXe6
notice, that those are no longer identical!
the ‘UUID’ is only needed and seen by VirtualBox programs so this dosen’t matter.
now you should be able to start your clone and have it still registred.
sorry – I used &tl; and > in my post, which got filtered out
here replaced by brackets
Tried several versions now and found one, that did the trick nicely:
When cloning a vbox do NOT create new MAC Adresses for the virtual network-adapters.
After creating a clone of a registred Win7 vbox BUT NOT starting it!!!
do the following:
# vboxmanage showvminfo “[name of my master installation]”
find the lines containing the string ‘UUID’
you could simply grep for it like this:
# vboxmanage showvminfo “[name of your master]” | grep UUID
UUID: df1XXXXX-XXXX-XXXX-XXXX-XXXXXXXXXXe6
Hardware UUID: df1XXXXX-XXXX-XXXX-XXXX-XXXXXXXXXXe6
notice, that both are identical!
now set the “Hardware UUID” of the newly created clone:
# vboxmanage modifyvm “[name of your clone]” –hardwareuuid “[the uuid you just found out]”
and add the Hardware UUID to the BIOS Image of your clone:
# vboxmanage setextradata “[name of your clone]” “VBoxInternal/Devices/pcbios/0/Config/DmiSystemUuid” “string:[the uuid you just found out]”
now check:
# vboxmanage showvminfo “[name of your clone]” | grep UUID
UUID: 8a4YYYYY-YYYY-YYYY-YYYY-YYYYYYYYYYb9
Hardware UUID: df1XXXXX-XXXX-XXXX-XXXX-XXXXXXXXXXe6
notice, that those are no longer identical!
the UUID is only needed and seen by VirtualBox programs so this dosen’t matter.
now you should be able to start your clone and have it still registred.
Wouldn’t be less long winded, backing up the activation tokens of the original and restore them on the clone? (standard cloning process)
Several tools can do that with a couple of clicks!
Much better than all that fiddling on the CMD line 🙂
None of these methods work for a full-clone of Windows 7 ?
tried all methods here and a few new ones myself .. same result.
Thanks for sharing this knowledge, i sucessfully cloned a windows vm for backup purposes using the information Martin shared
vboxmanage setextradata “[name of your clone]” “VBoxInternal/Devices/pcbios/0/Config/DmiSystemUuid” “string:the uuid of the original vm”
worked like a charm
thanks!
james
Glad you got it working!
So, just so that I am clear. If I follow this process for my Win2k8r2 Test server to clone 2 more VMs, they will all be able to run simultaneously?
Does this trick also work with Windows 8.1 ?
I tested this with Windows 8. It seems to work.
What’s wrong with this article? None of the images are loading.